Apr 29, 2012

Another Sister Sunday

Hi Everyone! Today A is back to teach us the tricks of the trade with cupcake decoration! I cant wait to get my hands on some of these corn on the cob lookalikes! Perfection of a bbq theme party (or just when you feel like something sweet) Since the sun is still gracing us with its presence, this will for me kick of the bbq season!
love K

Well, here in Bergen – the rainy city- the sun has finally graced us with its presence! And with sun, comes all the fun things to do in it. It seems as though everyone here is making the most out of the sunny weather- going hiking or barbecuing with friends on little spots of dry grass with disposable mini barbecues! And it just so happens that Barbecuing sort of kinda is the theme of today’s post-
 Corn on the cob cupcakes.


You will need:
Corn on the cob holders
3 cupcakes for each “cob”
Yellow Frosting
Jelly Beans (I used Jelly Belly´s in different yellow and white shades; lemon, pineapple, vanilla, toasted Marshmallow, banana, piƱa colada) approx. 27-30 for each cupcake
Starburst candies


1.     Start by frosting one cupcake
2.     Frost the second cupcake and place it next to the first
3.     Make a “bridge” with frosting connecting the cupcakes
4.     Frost the third, and connect it to the others
5.     Start by randomly placing the jelly belly´s on the cupcakes, I really liked the banana flavored one, because it had these brown spots, which kind of made the corn look like it was burned on the barbeque
6.     When you have placed all the jelly belly’s on the corn, put the stardust candy in the micro for a couple seconds, and shape it like melted butter and place it on the corn
7.      Stick in the cob forks
8.      A volia – “dinner” is served


It is so easy, and looks so much like real corn on the cob, don’t you think!?
And great for a barbecue dinner!

Hope you liked them!


Apr 28, 2012

DIY Braid-a-Bracelet

The sun is peaking on a perfectly polished saturday, aw (I know I shouldn't be saying cause I'm sure it will lead to clouds and rain... but it had to be shared!). 
But if rain do arrive (or if you are already in a rain cloud) this is the perfect DIY to keep you occupied. 

When I was up north last month Dadda (my grand mums sister) gave me an old sowing box with stuff that their mum had collected. It was filled with all ribbon, cute buttons and old lace, I mean HEAVEN! 
The bracelet DIY for today is made with thin gross grain ribbon (from the 18hundreds.... actually), two jump rings, a lobster lock and some gold chain.


Bracelets: Guest Post I made for U Create here, J.Crew wrap bracelet, todays DIY, DIY soon to come, DIY here, Spike bracelet from ASOS.


Apr 27, 2012

Cocokouture Mag Interview


Hi Everyone,
Can you believe its Friday again? YAY, hope you have so much fun stuff planned!
Mine is packed as usual, great friends, good food and relaxing (less of the later actually!)

A few weeks back I was interviewed by the lovely people over at Coco kouture magazine and yesterday it went live. Head on over and check it out.

Necklace tutorial here.

Apr 26, 2012

DIY Bead Organizing

So its finally time to organize my bead collection, and its looong over due! As of now they are all in different little ziplock bags. I have been pondering on how to do this for the longest time. You know those bead organizers you can get on ex Michael's? well, i dont really like them much and they are so over priced. The answer? Fish hook containers! they are super cheep and are PERFECT for the task. They are transparent so you see the content clearly, and the walls are removable so you can choose the size of the room dependent on the size and volume of beads.


I am doing mine color coordinated (clearly) !

Apr 25, 2012

Im Not a Robot


Although this might be an obvious statement, blogger(.com) does not agree. 
After the word verification was activated, commenting on even the most amazing blog has turned in to quite the pain in the ass. To be honest, I always have the hardest time figuring out the letters, and how frustrating is that??
Anyway, I had the word verification till yesterday ONLY because I had no idea on how to remove it, and I guess too lazy to figure it out (Opsi). 
But the lovely lady over at Creative Mind wrote me a msg saying I should remove it. I had been thinking about it forever, but this got me kick started, haha! 
SOOOO, if there are more people out there that hate it (and I am sure it must be because it is totally annoying)  that wants to remove it (and why would you not??)

This is a quick how too:

Apr 24, 2012

DIY Wrap Bracelet

There are so many great wrap bracelets out there, but Chan Luu is my fav! 
But for 220 Euros a piece they are a bit pricy!! Well, not to worry because they are suuuper easy to make yourself! it is a bit time consuming depending on how many times you want them to wrap, but so worth it!! When you are done, make a few knots that way you can regulate the size!! go crazy with beads and colors!! 

** updated instructions here**


You tie your thick cotton string and a transparent beading line (or fishing line, whatever you have around) to your button. Make sure that you have two long pieces of cotton string cause they will be your “base”.
Start by adding a bead to the transparent line, loop it around the left one cotton string, then back through your bead. Loop the transparent line around the right cotton string before you add your next bead. This you repeat until you have it as long as you would like your bracelet to be. When you are done you make a knot (making sure to include the transparent line and fasten it securely). Make another knot a bit from the first one, that will let you close your bracelet with the button. If you want to be able to adjust the size keep making knots for at many options as you would like (see the waaay bottom right picture).


** Update: the lengt of the strings I used was 25inch*2 (so 50) for the thick cotton string, and the same for the fish/beading line. **


Hope you are as thrilled by this as me!! (cause this might be my fav DIY in a long time!!) 


Apr 23, 2012

DIY Isabel Marant Look-a-like jeans

I am in love with Isabel Marant's red batic jeans from the 2012 spring line and they are so easy to make. 
I cant wait to get my clorox out this weekend! 

Photocredit: 12 , 3 , 4 , 5 , 6


You find a great tutorial for bleached jeans over at "here is now".
Let me know how it goes


Apr 22, 2012

Sister Sunday


Hello everyone!

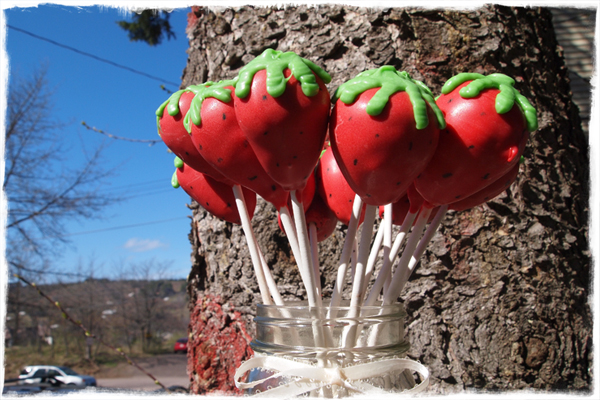
Summer is fast approaching (fingers crossed) and feeling inspired by the sunshine and flowers that have started making their reappearance this week, I decided to make strawberry cake pops. 

Cake pops are super simple to make (If you havent done them before you find more detailed instructions here):
Mix cake and frosting, and form balls. Dip them in chocolate. 
I put Rolos in mine and shaped them like strawberries. 
Then I dipped them in white chocolate dyed red. After they had dried, i drew the small seeds on with a black food color marker and used green chocolate for the leaves. 
I really enjoyed the little surprise Rolo inside, feel like it gave them that special extra.
The only thing is, now I really cant wait for summer and the real thing.


Apr 19, 2012

Freshwater Pearl Earrings

This weekend could not come any sooner (Is that the case every week maybe??). I feel like I have been running a life marathon for the last months, in between visiting my grand pap, vaca in Pairs, spa with my mum, and normal work there hasn’t been time for much else! Not that I needed anything, these were all amazing events and so much fun, but it will be nice with a weekend with no plans (except a few dinners and a gym class, haha)! Well, hopefully I wont be bored for after so much action a full weekend of nothing might just be too much! I am counting on the blogosphere to keep me occupied. To be honest I am already getting ants in my pants, I need something fun to happen. 

I showed you the freshwater pearls earrings I made at my grands paps (here) (digression: Man that was a crafty weekend, maybe up north is my inspirational heaven and I need to go there all the time now?? Anyway…) So, like I said I broke a pearl bracelet and decided to make it in too earrings.

You will need: round metal beads, earring hoops, fresh water pearls (or other beads, I am sure Swarovski beads would look great) and those metal pins with flat bottoms (what are they called please English speaking people?)


1. Add your bead to the pin.
2. Bend it around your round nosed pliers
3. After twisting it around the top of the bead a few times, cut of the excess.
4. Add the freshwater pearl "charms" you made and the round metall beads every other time.
5. Add as many as you want, I like them to be a bit over half full! attach the hoop and you are ready to wear them!! YAY :)

Try it with different beads and metal colors! Hope you enjoy! let me know how it goes!


Apr 18, 2012

Coachella Celeb Style

The Coachella festival basically set the standard for summer festival looks for the young and hip.
This year will prob be no different. Here are a few of my fav looks from the festival.  As always boho is a must, I mean its festival season after all.
Check out Rihanna's shorts! Pretty rocking, and so easy to DIY!!! Some studs and an old pair of jeans and you are on your way! Loving Kate's tigerT (do you know where she got it??) and Vansessa's feather head pice!! We will def be seeing way more of this as the music festival season rolls out!


photocredit: 1, 234,

Apr 17, 2012

Old Shirt, New Skirt!


I know I have been ranting so much about spring in Norway, and well… the world decided to prove me wrong (and won). I woke up in disbelief today.. Thinking: I must still be dreaming ( a horrible nightmare about living inside a snow globe, brr), but no.. time to face the fact.. it was actually snowing outside, big, bright, golf ball size cotton balls.. I guess this is what I get from living where only polar bears are made to live.


A few weeks back when there was still green grass on the ground (I know that sounded backwards, and trust me it totally feel backwards!!), a nice 15C and the sky was bright blue (aw, what a great time). I was going out to see friends, I had not yet taken my summer wardrobe down from the attic (and now its def staying up there) but wanted to wear a skirt. So here is a tutorial on how to make a pencil skirt from a stretch long sleeve.


How great is this? It gave me so many more outfits with no extra cost, I mean we all have some long-sleeved laying around right?
The best part for? No cutting included so you can wear it as a long sleeve again tomorrow, if you want! More bang for your wardrobe buck is always so thrilling!

By the way, if you are wondering why I dont have hands. You ask me?? Right back at you!! I guess my mum doesnt like my hands and decided to chop them off in every single picture.


Apr 16, 2012

Striped Shirt Obsession.


Don’t you just hate being sick?? It’s such a waste of time! I feel like I have been for ever now (I know less than a week but still) So if anyone has any great tips and tricks for 
1. Strengthening the immune system 
2. Getting over a upper repertory infection, Please let me know! (PLEASE!!)

You might have all hear about my everlasting quest for the perfect striped t-shirt. My answer to that, and many other questions in life (clearly) is DIY! After finding the perfect one at J.Crew (announcing it here) I have yet to make one (What the heck??? I know.. there just issnt enough time for everything I want to get done). Anyway, I was looking through True Blue Me & You (A great place to scope for new DIY blogs! She is amazing at finding good DIY's online) and found a great striped shirt DIY over at Henry Happened

I am def taking my J.Crew inspiration

and following Stephanie's easy DIY this weekend.

I especially love her color combinations, check them out


How cool are they right? 


Apr 15, 2012

Another Sister Sunday

Today is another Sister Sunday! (YAY). One of my best friends A is great at making and decorating cupcakes (I am not biast, she really is great!!)! And today she is showing you the ropes! I have known A my whole life. We were running in between each others houses in bare feet and PJ's my entire childhood (almost :). So now both my lil sis M and almost sister A are co hosting Sister Sunday! How great are these popcorn cupcakes? Let the Sunday movie marathon begin! 
love K

Let me introduce myself, my name is A and I am a childhood friend of K´s - we sort of, kinda, grew up together.  That is K to the left, cute or what? and me to the right.
We like to call each other sisters, that is why this blog entry is called Another Sister Sunday and I am going to fill in for her little sis M every once in a Sunday.


I love to decorate cupcakes in creative ways and here is one of them:

DIY Popcorn Cupcakes!!

All you need is this:

- Mini marshmallows: approx 10 yellow and 10 white for one cupcake
- Cupcakes (I used simple vanilla cupcakes)
- Popcorn cupcake wrappers (I bought mine on ebay)
- Frosting – (buttercream or cream cheese, preferably a frosting that is white or light yellow)
- A pair of scissors
- Tape
- Spatula


Use a pair of scissors, and give the marshmallows two little snips at the top, so that the top of the marshmallow is divided into four parts.
You will need approx. 10 white and 10 yellow to cover a normal sized cupcake.


Frost your cupcake. Tape the cupcake wrapper around the cupcake, then simply place the marshmallows randomly on top. After you have covered the whole cupcake in marshmallows, place another few on top and voliĆ” – you have your super cute popcorn cupcakes!


Great for a sunday movie night or what? Enjoy the rest of your weekend!


Apr 13, 2012

Friday SneakPeak and Etsy obsession

I tend to get sick after exciting vacations. Anything more than just relaxing by the beach and I'm out cold. (seriously!) No need to say, after a hectic longweekend in Paris, this week has been hell! I will spare you the details, but a key color has been green (as in snot green)! Luckily the weekend is here and my mum is whisking me away to a SPA down south for a "recovery" weekend.
I know..... a vaca to get over my vaca! But this time it is def needed.

I am normally more of a tiffany silver bead, pearl or pyramid stud kind of girl. But after breaking a freshwater pearl bracelet two weekends ago. I made these once (ill show you how next week).
Still classy with just the right amount of bling. Love them?
I am sure you are all as obsessed with Etsy as me. Well, I had never really ordered anything (although countless hours have been spent browsing) but when I saw this gold monogram necklace I knew I needed to get it! Just got it in the mail yesterday and have been wearing it ever since. So quick and easy and amazingly personalized.
The diamond "love" necklace is one of my very fav's, my Boy friend gave me last year and the two go together perfectly, yay!!! (I am sure you can find something similar of etsy as well) 

Wish you all an amazing weekend. 


Apr 12, 2012

U Create Guest Post

Today, I was invited to be a guest by the amazing ladies of U create. 
Its such a great site with so many great crafting ideas, so I am really happy to be a part of it. 
Check out my post here.


*Sneak peak*


Apr 11, 2012

T-shirt Update Kate Spade Style

Bonjour everyone! I am back from an amazing trip to Paris, oh lala what a city. 
Returning with a massive flu and pumped full of antibiotics, oh well.. all worth it! 
I will give you all a load-down of the amazing places we visited as soon as I'm fever free. 

I am sure you are all aware of my Kate Spade obsession by now. The bi-daily email update always bring me so much inspiration and this lovely T was just screaming DIY. 
How cool is it that they are making something as casual as a T into such a pulled together piece. 
I decided to update my fav J.crew T and add a black bow. 

Photocredit right picture


All you need is a T, needle and thread, and some gros grain ribbon (I got mine from a fancy shopping bag, how great is that?? recycling rocks! This specific bags is from one of my fav shoe stores! Its in Trondheim, so me and my mum always visit when we are up there! Check out their web site here. ). 30 min and some sowing later, tata! Can't wait to wear it!!


Apr 8, 2012

Sister Sunday: Oatmeal Obsession


I have a confession to make: I am really bad at eating breakfast. I know it is the most important meal of the day, and everything, but when I'm snoozing in my bed, those extra 20 min underneath the blankets wins every time. That is why I decided to make some breakfast that had almost no prep time.
Overnight oats and baked oats. Two yummy an super healthy breakfasts that you can make in advance. They both contain oats and chia seeds and have def helped me start every day better.

Baked oats (adapted from here)
2 eggs 
2 cups applesauce, unsweetened
5 cups, Old Fashioned rolled oats
1 banana, mashed
2 3/4 cups milk (I used 1%)
1/4 cup chia seeds
6 packets of Sweetleaf Stevia or 1 1/2 teaspoons stevia powder
1 tablespoon ground cinnamon
3 teaspoon baking powder
1 teaspoon vanilla extract
1 teaspoon salt

Optional toppings: raisins, walnuts, chocolate chips


Mix everything in a big bowl. Add additional ingredients or toppings. I mixed in blueberries or rasberries in some of mine, and I also made some with brow sugar and pecan nuts on top.
Spray your liners with some oil before you fill them and bake at 350 F for 30 min. Cool and freeze.


These can be eaten like they are, or like I prefer them: heated in a bowl with fresh milk and blueberries.
Tip: remove from the cupcake trays as soon as they are out of the oven.


Overnight oats (adapted from here)


1/4 cup uncooked old fashioned oats
1/3 cup skim milk
1/4 cup low-fat Greek yogurt
1-1/2 teaspoons dried chia seeds


Put all the ingredients in a mason jar and shake.
Add flavors such as peanut butter, apples, berries (frozen or fresh), bananas, or anything that flats your boat.
So, there you go: two ways to start your days healthy and stress free.


Apr 7, 2012

Home Background info

Today we are going to different antique stores to look for cool furniture! I literally cant wait to see what we come up with! Last year I bought an appartement (se below) they are still building it, but its supposed to be done after summer and I cant wait!!!
Hopefully I find something that can make it Paris chic!!!

Sneak peak!!

And you are all invited to parties (hopefully as) fabulous like this: