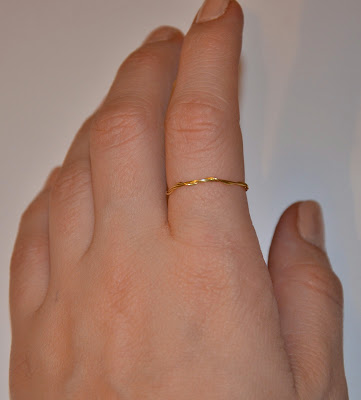
I have loved a lot of stuff in my life, in the late 80’s it was overalls, 90’s it was tights (still loving this one actually), but a love that have always remained in my heart is bows. There is something about them that has grown with me from I was 5 and wore them in my hair, till now when I want to wear them on my finger (fiiiine, sometimes I still wear them in my hair) . They are cute, pretty ,and classy, everything a girl needs in life. Today’s bow is a dainty bow ring. So easy to make and totally makes the outfit. As much as I love when people over-do-it with rings, sometimes its nice with just one simple one, and if you feel the same way todays DIY is for you.
Jeg har ikke vokst av meg min kjærlighet for sløyfer. Jeg liker de på alt, smykker, jakker, belter, you name it. De siste sesongene har det vært stort fokus på masse store ringer, men av og til kan det være kult å følge uttrykket «less is more» å kun ha på seg en kul ring så denne ene får all oppmerksomheten. Denne ringen er perfekt til dette formålet.
Cute eh?
You don’t need a lot to make this ring, most of it you can even just find it in the garage (how great eh?) but you will need: Gold colored wire 0,5mm or thicker (or silver if you like that) , cutting pliers to cut it, something with a handle similar in size as your finger to twist it around, and a piece of black duct tape.
Til denne DIY kan det tenkes du har alt liggende I garasjen. Så den er perfekt for de dagene du står i døren og føler du mangler det lille ekstra. Du trenger, gull farget metall tråd 0,5mm eller tykkere, avbiter tang, et håndtak eller liknende på str med den fingeren du vil bruke, og sort gaffa teip.
Instructions after the jump...
Start by twisting the wire around the handle of the (in my case) screwdriver. After three times cut it. This will be your ring. Measure for fit.
Begynn med å surre metal tråden rundt håndtaket får å skape en fin form på ringen. Når du har surret tre ganger rundt holder det (spørs litt på hvor tykk du vil ha ringen) og du kan klippe tråden.
Twist one of the ends around the ring creating a pattern, and preventing the three parts from separating.
Deretter surrer du en av de tre rundt de to andre, dette er for at de ikke skal skille seg på fingeren og for å lage mønster.
Make sure the two wire ends are at the same place and tape them together. This isn't very pretty, but better than getting your ring caught in your new Alexander Wang silk/cashmere T ruining the shirt (and the week).
Pass på at begge endene slutter på samme sted så du kan samle de med en liten bit teip. Dette forhindrer at de løsner og hekter seg fast i klærne
Then take a about 10cm long piece of wire and wrap it around the center of the ring, fastening it. Shape a bow with the wire, cut of the long ends and tata you're done!
Deretter fester du en ca 10 cm lang bit med star tråd rundt midten av ringen, form en sløyfe klipp av de lange endene og tata. Du er ferdig og har enda en ring å legge til samlingen.
Let us know how it goes!


Loooovee love love your blog. amazing. follow eachother?
ReplyDeleteim already following you.
much love, alex
itsmineimadeit.com
Thank you hunny! for sure!!
ReplyDeletelove K
Wow! Great job! I love it :)
ReplyDeletewow...so cute...and so easy to make!!!love it!!!
ReplyDeletethank you for your lovely comment...your blog is great...i'm following...hope you keep in touch too!!!
a kiss from the
cocobloggers
I love bows too! This is such a cute idea!
ReplyDeleteWow, I just fell in love :) I´m totally making this on my own :)
ReplyDeletexx Ivana
Stop by sometimes :)
Macarons and Pearls
It's so lovely! Beautiful ring :)
ReplyDeletefashionatemybrains.blogspot.com
Thank you lovely ladys! let me know how it goes if you decide to try it yourself!
ReplyDeleteLove K
Like your blog dear,so original and cute!Good idea!!!
ReplyDeleteI follow you by now!
Skip to visit me, I'd appreciate your views on my page .. about a project that is close to myheart.
And if you like,follow me!
A hug ♥
Thank you, i will drop by for sure!!
ReplyDeletelove K
i like your blog and i love bows too. <3
ReplyDeleteThis ring looks so delicate and pretty ^_^
ReplyDeleteI LOVE this ring it looks so pretty and dainty. Is it very sharp on the ends? I wanted to make it for my 5 year old grand-daughter, but I don't want her to hurt herself. And if it is sharp do you have any ideas of how to fix that. I found your blog off Pinterest and I just LOVE it. I will be re-pinning some of your great ideas. Thank you so much for all your great ideas! :)
ReplyDelete